Cycling adventures can be both exhilarating and challenging, especially when mechanical troubles arise far from home. Mastering a few basic repair techniques not only saves time but also ensures you stay safety focused and minimize disruptions. Whether you are embarking on a one-day tour or a multi-day expedition, understanding how to handle common bike issues will transform you into a more confident rider. Below you will find essential guidance on equipping yourself with the right tools, diagnosing problems, and applying quick fixes—all while keeping your journey on track.
Essential Tools and Preparation
An effective roadside repair kit combines lightweight items with maximum utility. Before heading out, assemble the following essentials:
- Spare Tube: A true lifesaver in case of a flat. Carry at least one but two is ideal.
- Tire Levers: Make removal of the tire bead quick and painless.
- Pump or CO2 Inflator: Ensures you can restore proper air pressure.
- Multi-Tool: Look for a unit with hex wrenches, screwdrivers, and chain tools.
- Puncture Patch Kit: A compact patch kit for tubeless or standard tubes adds extra security.
- Chain Lube: A small bottle to maintain smooth drivetrain operation.
- Rag or Cloth: Helps keep hands and components tidy during repairs.
Before setting off, verify that your bike’s routine inspection is up to date: check brake pads, wheel alignment, and proper torque on all bolts. Label each item in your kit for quick access and stow them in a saddlebag or jersey pocket.
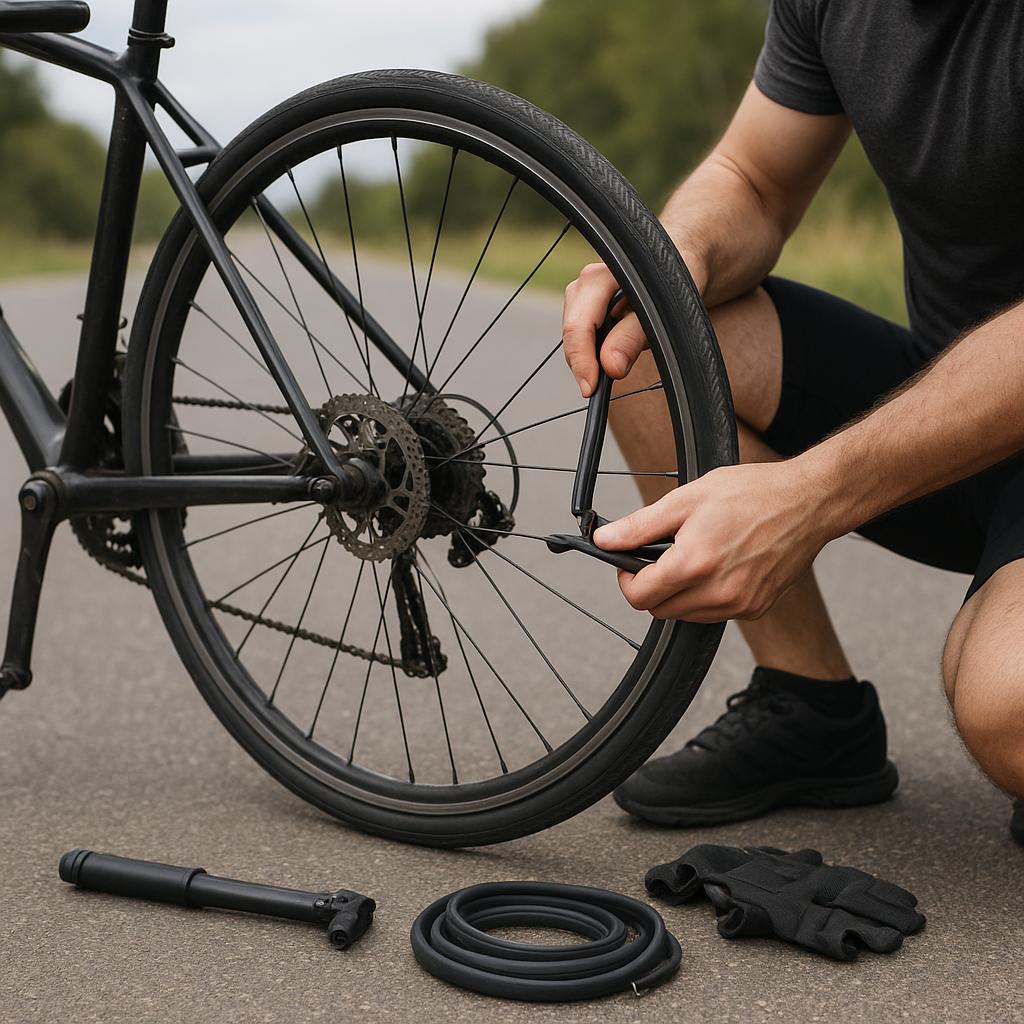
Addressing Flat Tires Quickly
Flat tires are perhaps the most frequent culprit that interrupts a cycling trip. Learning to identify the cause can save you repeated repairs:
- Locate the puncture by inflating the tube slightly and listening for hissing or submerging it in water to find air bubbles.
- If a sharp object is embedded in the tire, use a pair of pliers or carefully remove it with your fingers, taking care not to cut yourself.
- Use tire levers to release the tire bead. Insert one lever under the bead, hook it to a spoke, and use the second lever to pry the rest off.
- Remove the old tube, then inspect the tire interior for glass, thorns, or metal shards.
- Install the new tube or patch the existing one, seating it evenly inside the tire. Add a small amount of air to shape the tube before fully inflating.
- Check the bead for uniform seating and top up to recommended PSI.
This process can take as little as 10 minutes once you become practiced. Should you run out of spare tubes, master the art of patching: roughen the puncture area, apply cement glue, press the patch firmly, and wait for adhesion before reinflating.
Tackling Chain and Gear Issues
Unusual noises, slipping gears, or a stiff chain can derail your ride. Here is a quick diagnostic approach:
Chain Lubrication and Cleaning
- Wipe off dirt and old lubricant with a rag, pulling the chain through at each link.
- Apply a few drops of lube to the rollers, fully pedal backward to distribute, then wipe away excess.
Adjusting Derailleur Tension
- Shift to the smallest cog and loosen the cable anchor bolt.
- Use the barrel adjuster to fine-tune tension: turning clockwise loosens the cable, counterclockwise tightens.
- Test shifts through the cassette: each click of the barrel adjuster should improve indexing by one gear.
- If the derailleur hanger is bent, you may need a quick realignment using a sturdy straight edge—ensure the pulley wheels align with the cassette cogs.
Occasionally, chain links seize up. Press the chain tool’s pin just enough to loosen the link, then flex it back and forth until it moves freely. Always carry a short chain link spare for emergency replacement.
Brake Problems and Adjustments
Reliable brakes are non-negotiable for safe riding. On-the-road adjustments fall into two categories: mechanical rim brakes and hydraulic disc brakes.
Rim Brake Tuning
- Check pad wear indicators; replace pads if grooves are no longer visible.
- Center each pad so it contacts the rim evenly. Loosen the mounting bolt, align by eye, and re-tighten firmly.
- Adjust cable tension via the barrel adjuster: increase tension if the lever feels too loose or reverse to prevent rubbing.
Hydraulic Brake Bleeding (Temporary Fix)
- If levers feel spongy, remove a bit of fluid using a syringe attached to the bleed port.
- Pump the lever gently to expel tiny air bubbles—this won’t replace a full bleed but can restore basic function.
- Top up fluid if you carry a compact bottle, wiping away any drips to protect frame finish.
Remember that any major misalignment or excessive wear demands professional attention at the next available workshop.
Preventive Maintenance on the Go
Stopping problems before they start is the hallmark of a seasoned rider. Embed these habits into every excursion:
- Inspect tire pressure with a digital gauge before each departure.
- Quickly spin wheels off the ground to detect wobbles or rubbing components.
- Keep bolts and fasteners torqued to specification—use a mini torque wrench if possible.
- Regularly clean drivetrain surfaces to minimize grit and premature wear.
- Note any odd sounds and resolve them immediately rather than letting them worsen.
By integrating these checks into your pre-ride routine, you build confidence and reduce the risk of being stranded. The more familiar you become with each repair step, the faster and more efficient you’ll grow. Embrace these skills, carry your essentials, and pedal on with peace of mind.