Converting a standard multi-gear bicycle into a stripped-back, elegant ride offers riders an engaging project that combines mechanical insight with cycling passion. Whether you crave the minimalist aesthetic of a track-inspired ride or the efficiency of a gear-free machine, transforming your bike into a single-speed or fixie can provide a rewarding weekend project. This guide covers key benefits, necessary tools, a clear conversion path, and expert tips to ensure you achieve a smooth, reliable, and stylish new ride.
Benefits of a Single-Speed or Fixie Setup
- Simplicity: Without derailleurs, shifters, and multiple cogs, the bike’s profile is clean and fuss-free.
- Weight Reduction: Fewer components translate into a lighter bicycle that accelerates faster and climbs easier.
- Maintenance: With only one gear ratio, cleaning, lubing, and inspecting your chain and sprocket becomes quick and straightforward.
- Urban Commuting: A single gear means fewer adjustments on the go, making city riding more predictable and enjoyable.
- Performance: Direct power transfer from rider to wheel enhances pedaling efficiency and responsiveness.
- Aesthetic Appeal: The minimalist look stands out, giving your bike a timeless, streamlined appearance.
Essential Components and Tools
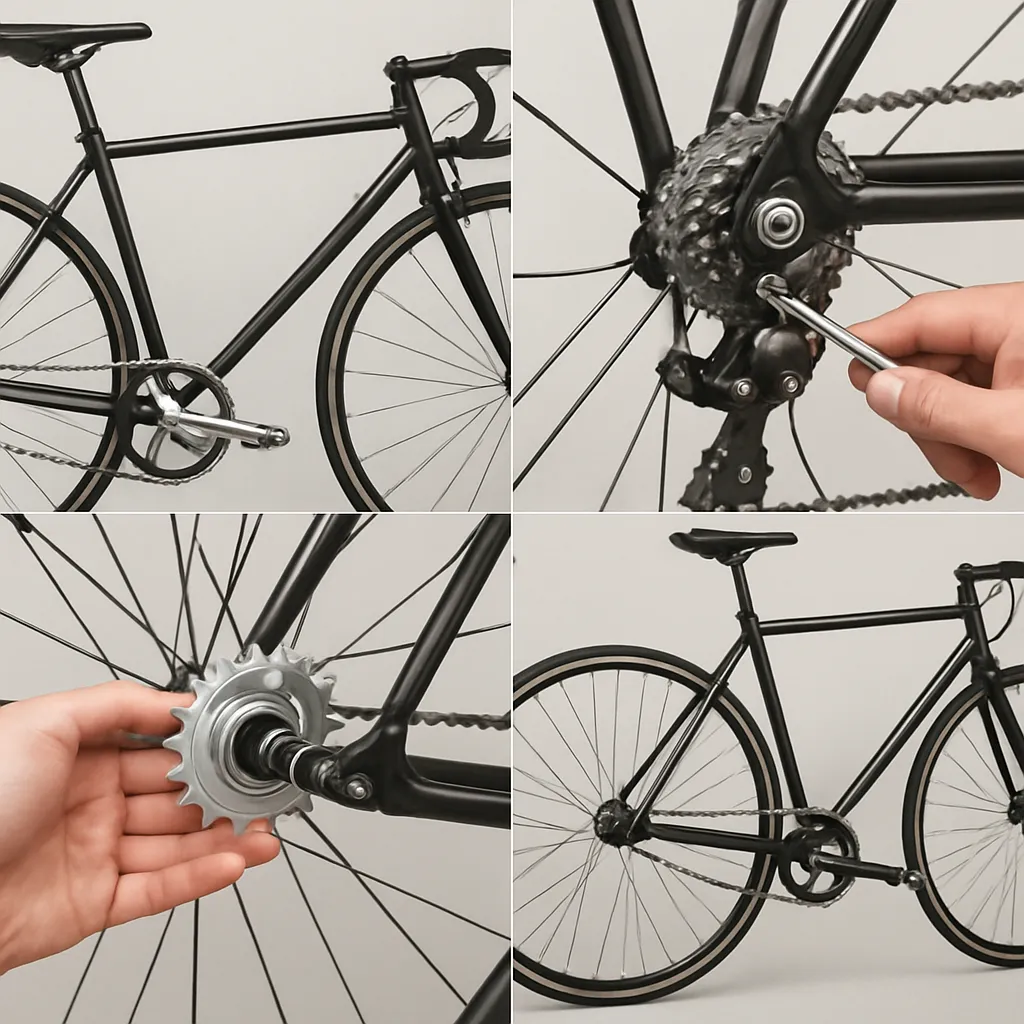
Drivetrain Simplification
Transforming your bike begins with reworking the existing drivetrain. You’ll remove your derailleur(s), cassette or freewheel, and excess cables. Then install a dedicated cog and lockring or a combination fixed/free cog on a flip-flop hub.
Required Parts
- Fixed-gear or flip-flop hub (for reversible fixed/freewheel options)
- Single-speed cog and lockring (or fixed cog plus lockring)
- New single-speed chain (narrow or wide depending on spacing)
- Chain tensioners (optional if your frame lacks horizontal dropouts)
- Track or fixed-gear pedals and straps (for improved connection and safety)
Necessary Tools
- Chain whip and lockring tool
- Bottom bracket wrench (if adjusting chainline)
- Adjustable wrench or cone spanners
- Hex keys and screwdrivers
- Torque wrench (to ensure proper tightness)
Step-by-Step Conversion Process
- Wheel Removal: Detach rear wheel from dropouts, loosen axle nuts or quick-release skewer.
- Drivetrain Disassembly: Take off derailleur(s), remove brake cable housing if interfering with chainline.
- Cassette or Freewheel Removal: Use the chain whip and lockring tool to undo the original sprockets.
- Install Single Cog: Mount the fixed cog on the hub flange if you’re going fully fixed. Secure with lockring at the correct torque.
- Chain Replacement: Fit a new chain sized to the desired gear ratio. A common starting ratio is 48:16 or 46:17 for balanced speed and torque.
- Achieve Proper Chain Tension: Position the wheel to center the chainline. Use horizontal dropouts or tensioners to tighten the chain moderately—snug enough to avoid slipping but not over-stretched.
- Reinstall Wheel: Slide the wheel into place, ensuring alignment. Check that the axle is seated fully and secured evenly on both sides.
- Brake Adjustment: If you retain front or rear brakes, reposition calipers for clearance and test lever travel.
Fine-Tuning Alignment and Tension
Accurate setup is crucial for a trouble-free ride. Misaligned chains can cause rapid wear, drop-offs, or skipping.
- Chainline Check: Measure from the center of your frame to the middle of the chainring and compare to the center of the cog. Aim for perfect alignment.
- Horizontal Dropouts vs. Vertical Dropouts: Horizontal dropouts allow you to slide the wheel back and forth for ideal tension. For vertical dropouts, install a pair of adjustable chain tensioners.
- Lockring Stability: Once tensioned, re-tighten the lockring to prevent the cog from loosening under pedal force.
- Wheel Dish: Ensure the rim is centered between the frame stays to avoid rubbing and uneven tire wear.
Riding Techniques and Safety Considerations
Transitioning to a gear-free bicycle means adapting your pedaling style and brake usage:
- Your legs become both the accelerator and the brake. Learn to resist pedal movement to slow down if riding fixed. If you prefer coasting, choose a freewheel setup on the flip-flop hub.
- Use sturdy toe straps or clipless pedals to maintain foot engagement on a fixie.
- Anticipate stops earlier since you lose the mechanical advantage of multiple gears for quick acceleration from a dead stop.
- Practice smooth circular pedaling to distribute force evenly, reducing knee strain and improving traction.
Maintenance Best Practices
One of the greatest perks of a stripped-down bicycle is minimal upkeep, but routine checks keep your ride safe and efficient:
- Inspect chain wear with a gauge at least monthly. Replace before excessive elongation occurs.
- Clean and lubricate your chain every 200–300 miles or after wet rides to maintain performance.
- Check the lockring’s torque frequently, especially during your first few rides after conversion.
- Inspect hub bearings and re-grease or adjust as necessary to ensure a smooth, silent spin.
- Examine brake pads and alignment if you retain either front or rear calipers.
Embracing Customization and Style
Part of the allure of a customization-friendly single-speed project is the freedom to personalize your build. Choose unique chainring designs, colored chains, or minimalist bars and stems to match your taste. Many riders add colored rim tape, sleek track hubs, or even minimal saddle designs to reinforce the stripped-back aesthetic.
Conclusion of the Project
Converting to a single-speed or fixed gear is more than a mechanical upgrade—it’s a statement of simplicity and urban freedom. As you tour city streets or country lanes, you’ll feel closer to the road, attuned to every revolution of the pedals. The combination of low upkeep, increased efficiency, and clean design can reignite your passion for cycling, offering a new perspective on what it means to ride.
