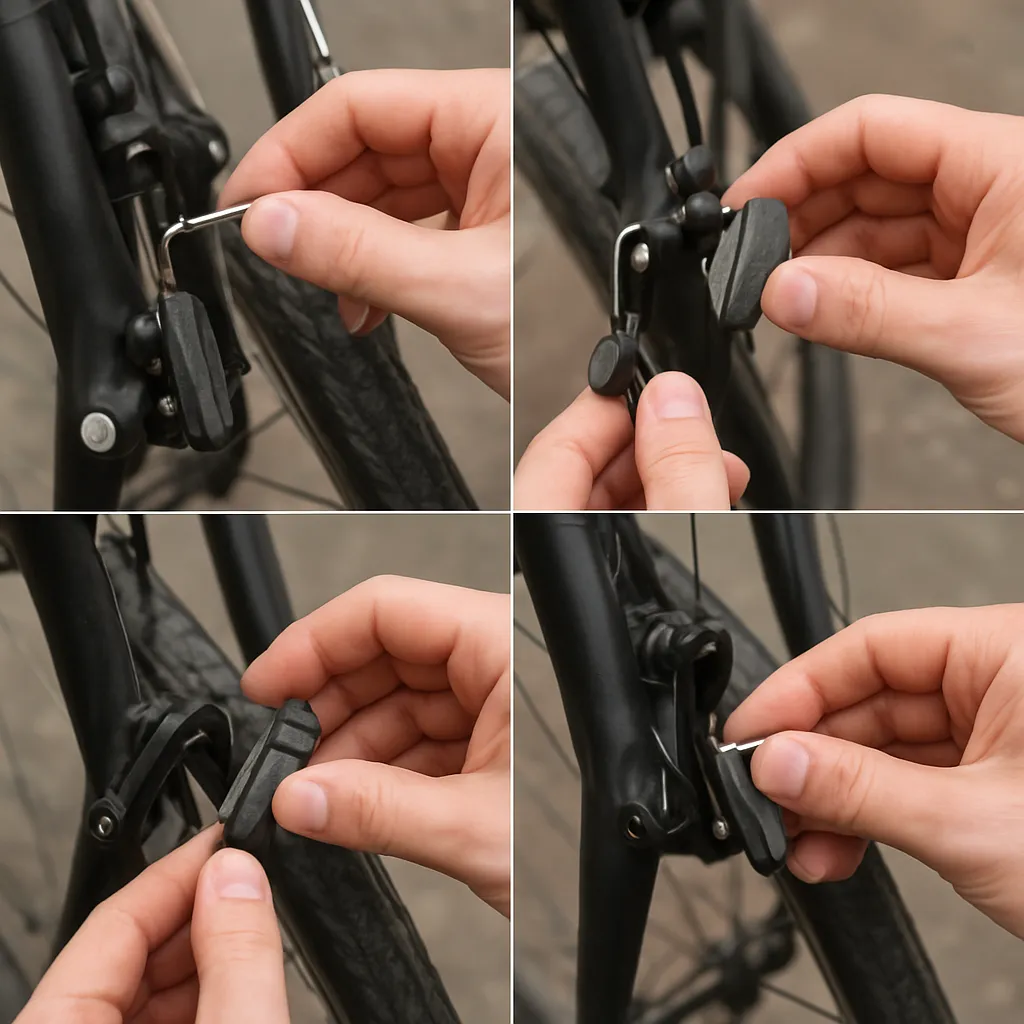
Cycling is more than just a mode of transportation; it’s a passion that combines freedom, fitness, and exploration. Whether you’re a casual rider cruising through city streets or an off-road enthusiast tackling rugged trails, maintaining your bicycle’s braking system is essential. Upgrading your brake pads not only enhances stopping power but also extends the lifespan of your rims or rotors. This guide provides a detailed, step-by-step approach to replacing brake pads, ensuring optimal performance and safety on every ride.
Tools and Preparation
Before you begin, gather all necessary tools and materials. Having everything at hand will streamline the process and prevent interruptions.
- Brake pads: Choose pads compatible with your brake type (rim or disc).
- Installation wrench or Allen keys: Typically 5mm or 6mm for most calipers.
- Flathead screwdriver or pick tool: For gently prying out old pads.
- Isopropyl alcohol and clean rags: For cleaning pad holders and disc surfaces.
- Rubber gloves: To keep oils and contaminants off sensitive parts.
- Small brush: For removing trapped dirt and debris.
Ensure your bike is securely mounted on a stand or flipped upside down on a soft surface. Check that wheels are stable and the frame won’t shift during the procedure. Good lighting and a clean workspace contribute to precise precision work.
Removing the Old Brake Pads
Removing worn pads is straightforward when approached systematically. Follow these steps to avoid damaging calipers or rotors.
1. Release Caliper Tension
- Squeeze the brake lever and maintain pressure to center the caliper.
- Use a zip tie or a small block of wood to keep pads apart, preventing spring loss.
2. Extracting the Pads
- Locate the retaining pin or bolt securing the pads. Loosen it using the appropriate Allen key or wrench.
- Gently slide out the old pads. If they stick, use a flathead screwdriver to coax them free.
- Inspect pad holders for gunk, metal shards, or corrosion.
3. Clean Holder and Caliper
- Spray isopropyl alcohol on a rag and wipe the pad slots thoroughly.
- Use a brush to dislodge any hardened debris.
- Check pistons or arms for even movement; apply a drop of silicone lubricant if needed.
Installing the New Brake Pads
With old pads removed and components inspection complete, install fresh pads following these guidelines.
1. Prepare New Pads
- Unwrap new pads and identify the correct orientation (inner vs. outer, leading vs. trailing).
- Lightly sand the surface of durability-enhanced pads to remove manufacturing residue, then wipe clean.
2. Positioning the Pads
- Insert the inner pad first, aligning it with the caliper track.
- Push gently until it seats fully, taking care not to bend the retaining spring.
- Insert the outer pad similarly, ensuring both pads sit flush.
3. Secure Retaining Pin or Bolt
- Reinsert the pin or bolt and tighten to manufacturer torque specs.
- Verify springs or clips are properly engaged and not twisted.
4. Re-center Caliper
- Squeeze brake lever several times to allow pads to grip and center around the rotor or rim.
- Release lever and inspect pad-to-surface clearance; aim for uniform spacing on both sides.
Fine-Tuning and Testing
Proper alignment and minor adjustments are crucial before hitting the road or trail.
1. Check Pad Contact
- Spin the wheel and observe any rubbing. Use caliper adjustment screws to fine-tune centering.
- Maintain a small gap (0.5–1 mm) to prevent drag while ensuring quick engagement.
2. Brake Lever Feel
- Test lever travel; if too spongy, bleed hydraulics or tighten cable tension.
- Ensure lever returns promptly and does not stay depressed.
3. Functional Test
- Perform a low-speed braking test in a safe environment, gradually increasing pressure.
- Listen for squeaks or grinding; these may indicate contamination or misalignment.
Maintenance Tips for Long-Lasting Performance
Regular upkeep extends the life of your new pads and preserves overall brake performance.
- Inspect pad thickness monthly and replace before it drops below 1 mm.
- Clean rotors or rims with isopropyl alcohol after every few rides, especially in wet or muddy conditions.
- Check for oil contamination; if spotted, remove pads immediately and decontaminate or replace.
- Store spare pads in a dry, dust-free container to maintain their quality.
- Schedule a full brake maintenance and lubrication of pivot points seasonally.
Following these steps and tips ensures that your bike’s braking system remains responsive and reliable. Proper pad replacement enhances riding safety and delivers consistent stopping power when you need it most.